When it comes down to app development, a developer or mobile app development company in India mostly prefers the Android platform. In fact, there are a huge number of Android smartphone users on a global scale. Hence ets understand what is android app development eclipse.
You will be surprised to know that 49% of the app users visit Google Play Store 11 times a day. The credit behind this increasing use goes to the developers that work hard to bring innovative app ideas. However, developing apps is a challenging task for any company or individual developer. Before anything, picking the right technology comes out as their first hurdle.
There are many choices available but Android Studio and Eclipse are two of the widely used tool for Android app development. Here, our focus will be on the Android app development eclipse. You will learn how to get started with Eclipse, how to set up, and much more.
What is the Android app development eclipse?
Eclipse is an Integrated Development Environment (IDE) for developing Android applications. It was first made for the Java-based application but now supports many different programming languages.
This IDE features a base workspace and many plug-ins that allow it to extend its capabilities and personalize the development environment.
As it’s free and open source, developers used it widely for building Android applications. You can download it on the macOS, Windows, or Linux-based system.
Android App Development Eclipse Features
- Simplified Software Update System
- Easy to use Functionalities
- Plenty of bundles and plug-ins available for extending its potential
- JPA and JSF tooling support
- Ideal for creating spring-based apps
- Used in many modeling projects
How to install Android app development Eclipse?
Before beginning the Android app development Eclipse process, you will have to download it first on your PC from the official website:

- Open Google Chrome on your PC
- Open the link https://www.eclipse.org/downloads/
- Now, click on the “Download x86_64” button
- Start the installation and wait for it to finish
How to set up Android app development Eclipse?
After you have installed the Eclipse, it’s time to prepare it for Android app development. Go through the following steps to setup this IDE for Android App development:
1) Install SDK
The eclipse will need Android SDK to work on your computer. You can download it online. Install it and move on to the next step. You can also install SDK later on in Eclipse while selecting your preferences.
2) Install New Software

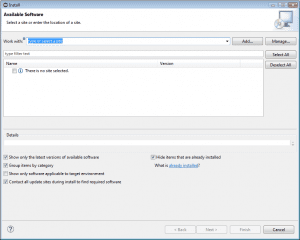
- Run Eclipse and from the home interface, click on the “Help” button. Go to the “Install New Software”.
- A new window will appear. In the work with box, just type “https://dl-ssl.google.com/android/eclipse/” and click “Add”.
- Again a dialog box will pop up, enter “ADT Repository” and hit the “Add” button. Now, tick the “developer tools” option shown under the “Name” section.
- One more dialog box will show up, click on “Next” and “Finish” to start installing the ADT plugin.
3) Setup the Preferences
The eclipse will restart when you are done with the installation of the ADT plugin. Right after the restart, a dialog box will come where you have to choose your preferences.
- Click “Open Preferences” > “Proceed”
- If the dialog box does not appear after restarting, choose “Windows” > “Preferences”
- Choose “Android” from the left panel where the software asks whether you want to send stats to Google or not. Click “Proceed”
- Move on to the “Browse” button and search for the SDK directory (C:\Program Files\Android\android-SDK)
- Click “Apply” > “Ok” to finish setting up your preferences
In case you haven’t configured SDK yet in your system, just click on “Install New SDK” > “Next” in Eclipse. One more dialog box will pop up, accept all the mentioned packages and click “Install”.
Note: If you have Android Studio installed, you can copy the Android SDK location path from “Android” > “Tools” > “SDK Manager”.
4) Create Android Virtual Machine (AVD)
When you are done with the SDK installation, you have to make AVD so that the apps you build can be run on an Android emulator.
- Open the “Windows” menu and choose “AVD Manager”
- Choose from the existing AVD and “Edit” or click on the “New” button to start creating an AVD
- If you are creating a new one, enter the name of your AVD and select the Android version
- Now, click on the “Create AVD”
- For those editing the existing AVD, they will have to edit the preference in the dialog box
5) Build Your First App
For building your first Android app, choose “File” > “New” > “Other” and then you will see a new dialog box. Choose “Android” > “Android application Project” and click “Next”. You are ready now to create your first Android application in Eclipse.
Why Android app development company in India choose Eclipse?
There are many tools and technologies that an Android app development company in India can use. On the topmost, we can name Android Studio, and then it’s Eclipse. Choosing the latter has many benefits as it provides plugins that an iOS development company in Bangalore, India can utilize to build iOS apps.
If you wish to choose an efficient and reliable app design software for enhancing your business in the field of mobile apps, there is no better alternative other than Android Eclipse for both iOS and Android app development.
Final Thoughts
Android App Development is an interesting field to get into and lets you earn a lucrative career. If you are thinking about a career in this, then you should start by gaining a basic understanding of what it is about and how to set up Android App Development Eclipse environments. It’s a great alternative to the Android Studio which comes with plenty of features.
Well, we have come to the last section of this article, and as always we hope that you have found our guide to be helpful. In order to get good things to develop android apps, you need good frameworks and tools. An eclipse is a good tool, mostly used in java development kits and it contains everything that you need to develop software.


 +91-984-5825982 | +91-996-4689921
 sales@cumulations.com
 Send your requirement