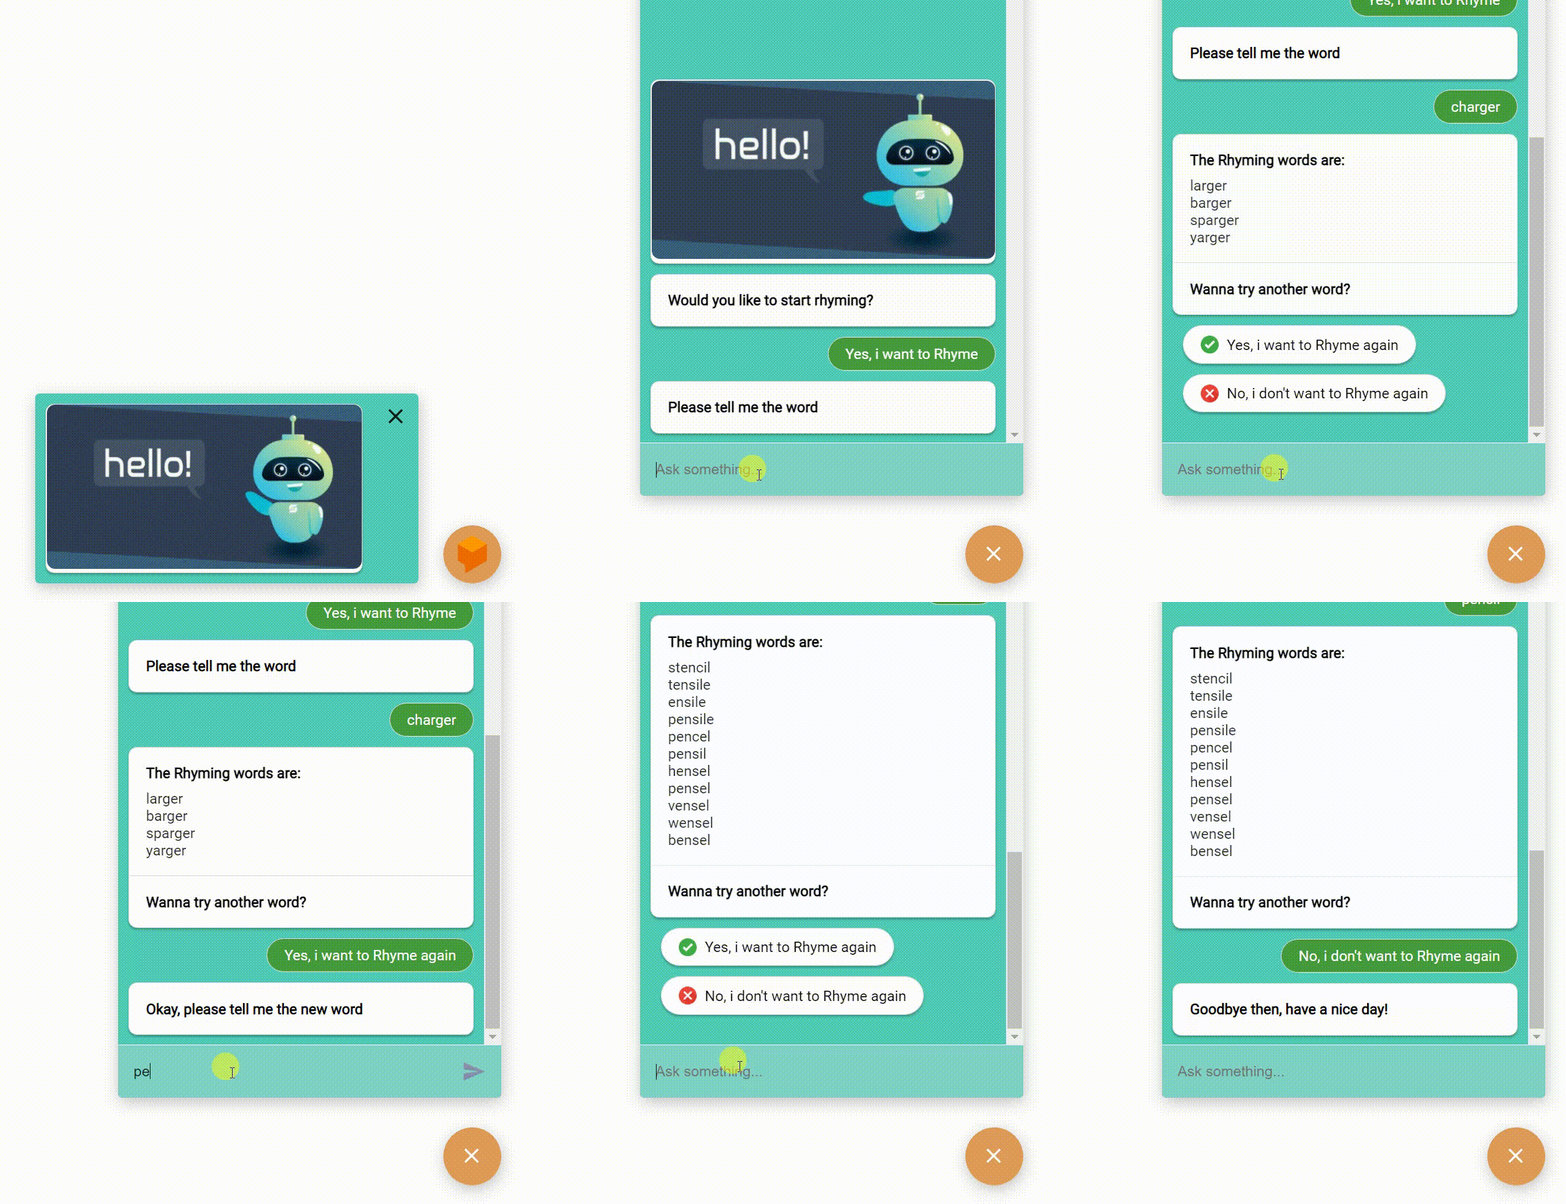
In this blog, we will be building a chatbot that collects information from the user input, and sends that information to the Node.js server where some API call is made and the response from that API is displayed as the chatbot response. Here’s how it would look like at the end:
Prerequisites:
- Basic knowledge on how to create a Nods.js server using Express framework.
- A Google’s dialogflow account where we can create the Project and Intents. One can go through this tutorial to learn about the same.
Google’s Dialogflow: A Brief Introduction:
Google’s Dialogflow is an NLP platform that makes it easy to design chatbots. Users can create something called an ‘Agent’ within the chatbot. Within an agent, users can create several ‘Intents’ in order to train the agent. A chatbot is like a call-center with many agents, where each agent is like a customer care executive who is trained to resolve a particular set of customer queries.
Connecting Dialogflow to Node.js:
- An Intent can get the response either from the Training phrases we add manualy while creating the intent, Or from the webhook response by the server. Here we want the response from our Node.js server so we will go for the second option.
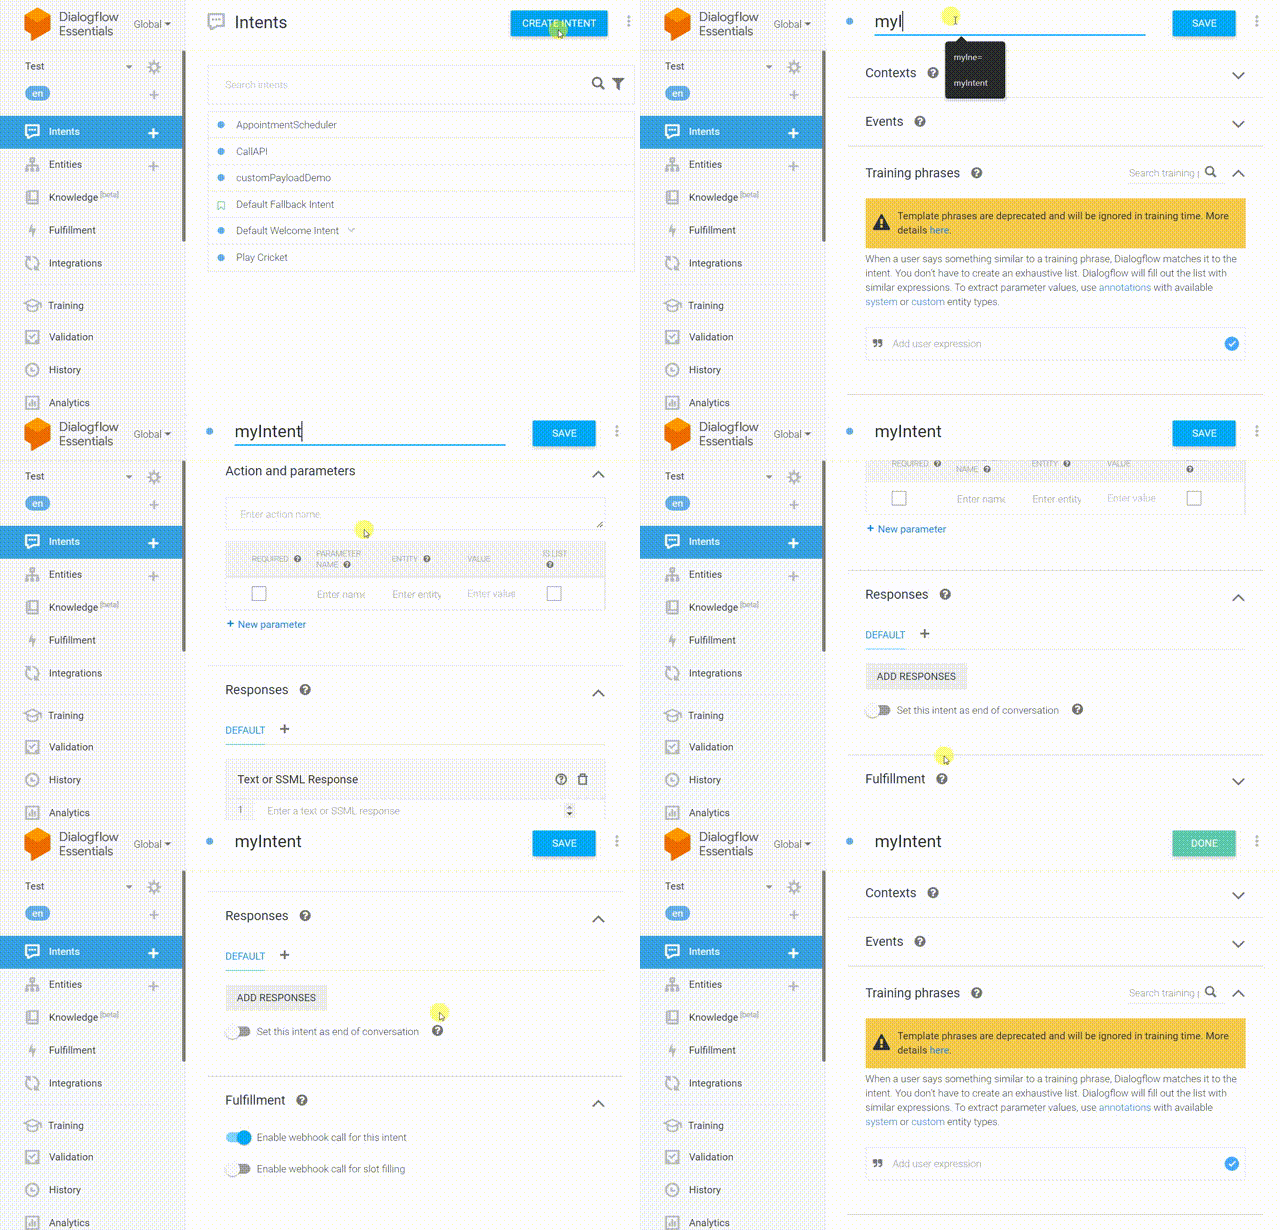
In order to get the response from the webhook, while creating the Intent we have to activate the “Enable webhook call for this intent” toggle under the Fulfillment dropdown:
- We can write the server code in the dialogflow console itself, for that we can navigate to the ‘Fulfillment’ section below the ‘Intents’ section. There we can choose the “Inline Editor” for writing the backend code.
But we will be writing our Node.js code separately and then connect it to the dialogflow intent. For that we will enable the ‘Webhook’ option inside the ‘Fulfillment’ section. After that we will paste the public URL of our Node.js code under the ‘Webhook’.
In order to get the public (https) URL we can deploy our Node.js code, Or we can use Ngrok which helps us to open our local port to a public port without deploying the code.
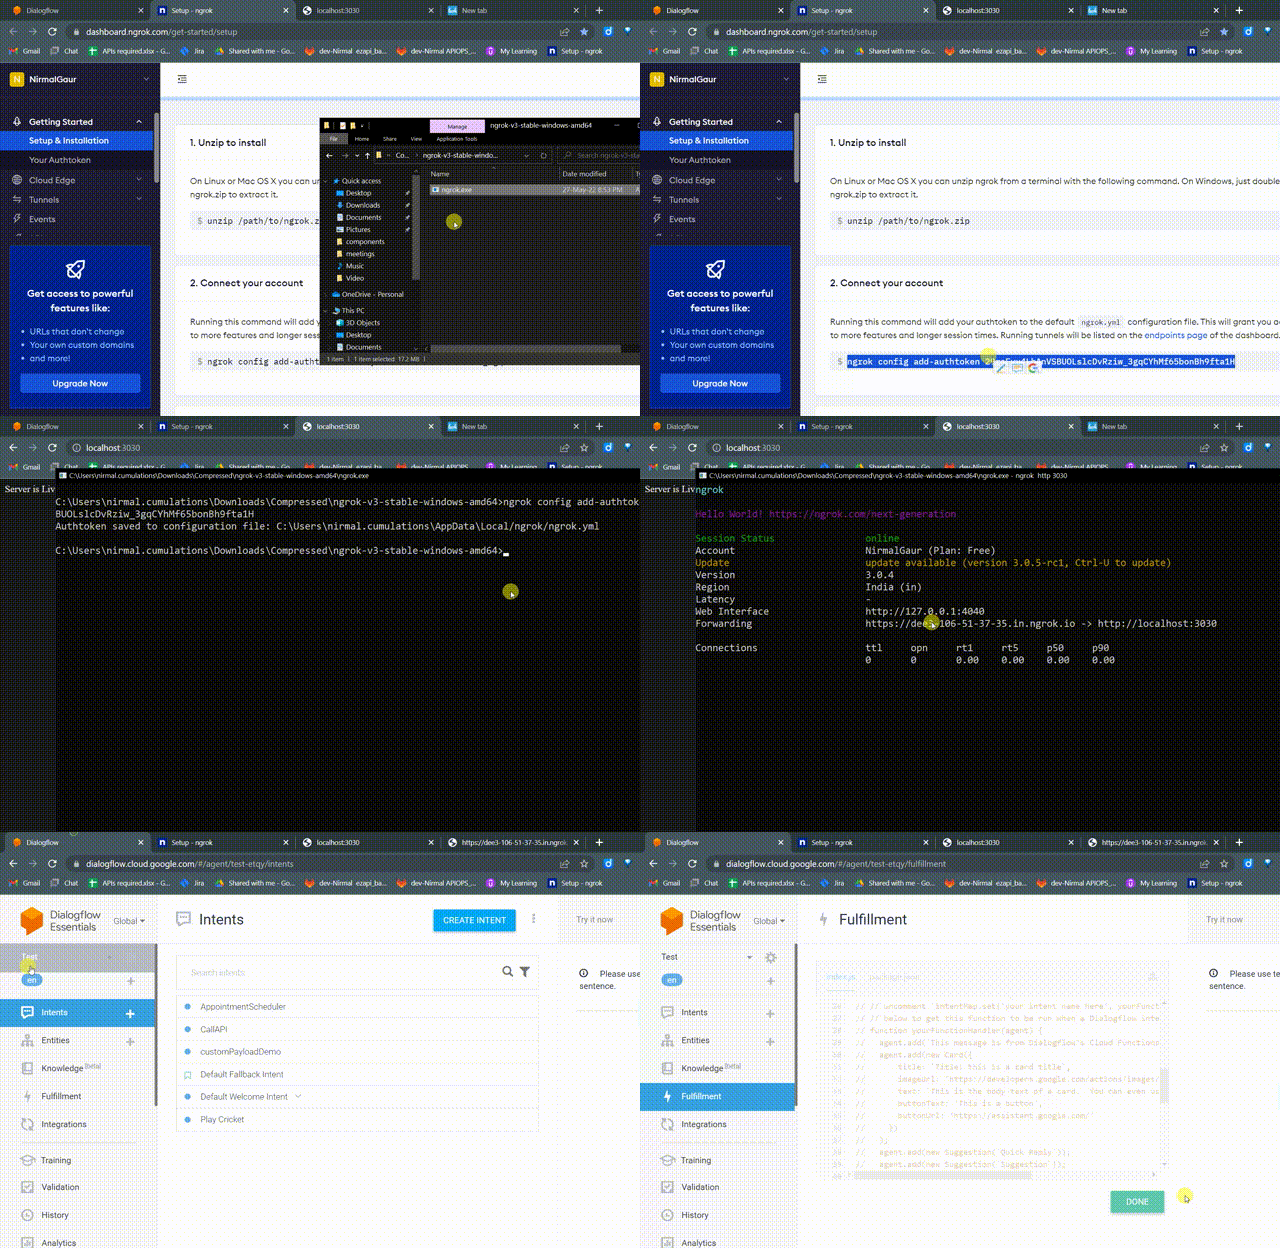
Note that this will work as long as the server is running locally. If the server is restarted then we have to do this again.
Sending Response from Node.js Server:
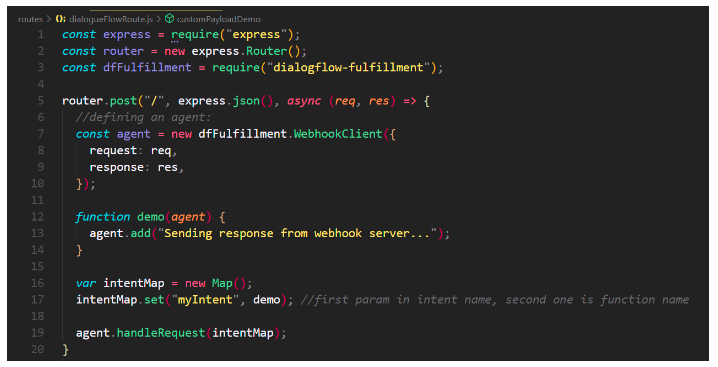
Now in the Node.js server first we will define the agent, for that we need to install a library called dialogflow-fulfillment. Once an agent is defined, we will define a function and pass the agent as a parameter to it. So when we pass an agent to a function, we can add something to that agent. After that, we have to map the function to the Intent for which we have enabled the webhook response in step-1:
We can also send custom payloads instead of just text responses. In order to add the payload to the agent, we have defined the payload first:
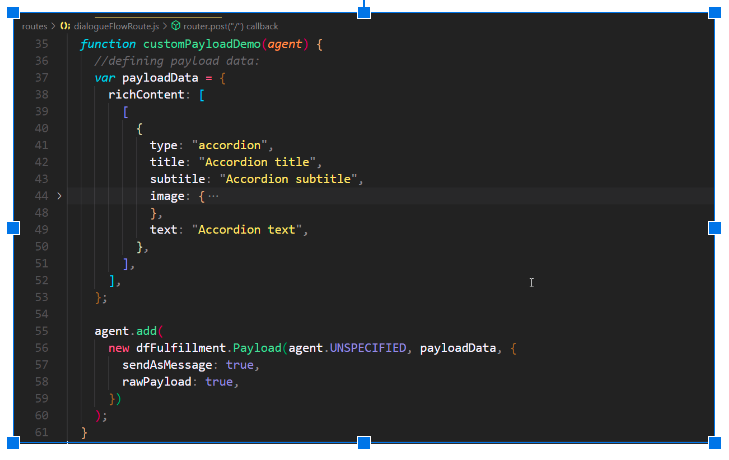
After adding the payload to the agent, we can map the customPayloadDemo function to the agent for which we want a custom payload as a response.
We will see how the custom payload is used to get images or buttons as responses (from the server) for the chatbot input request.
Getting Rich Response from the chatbot:
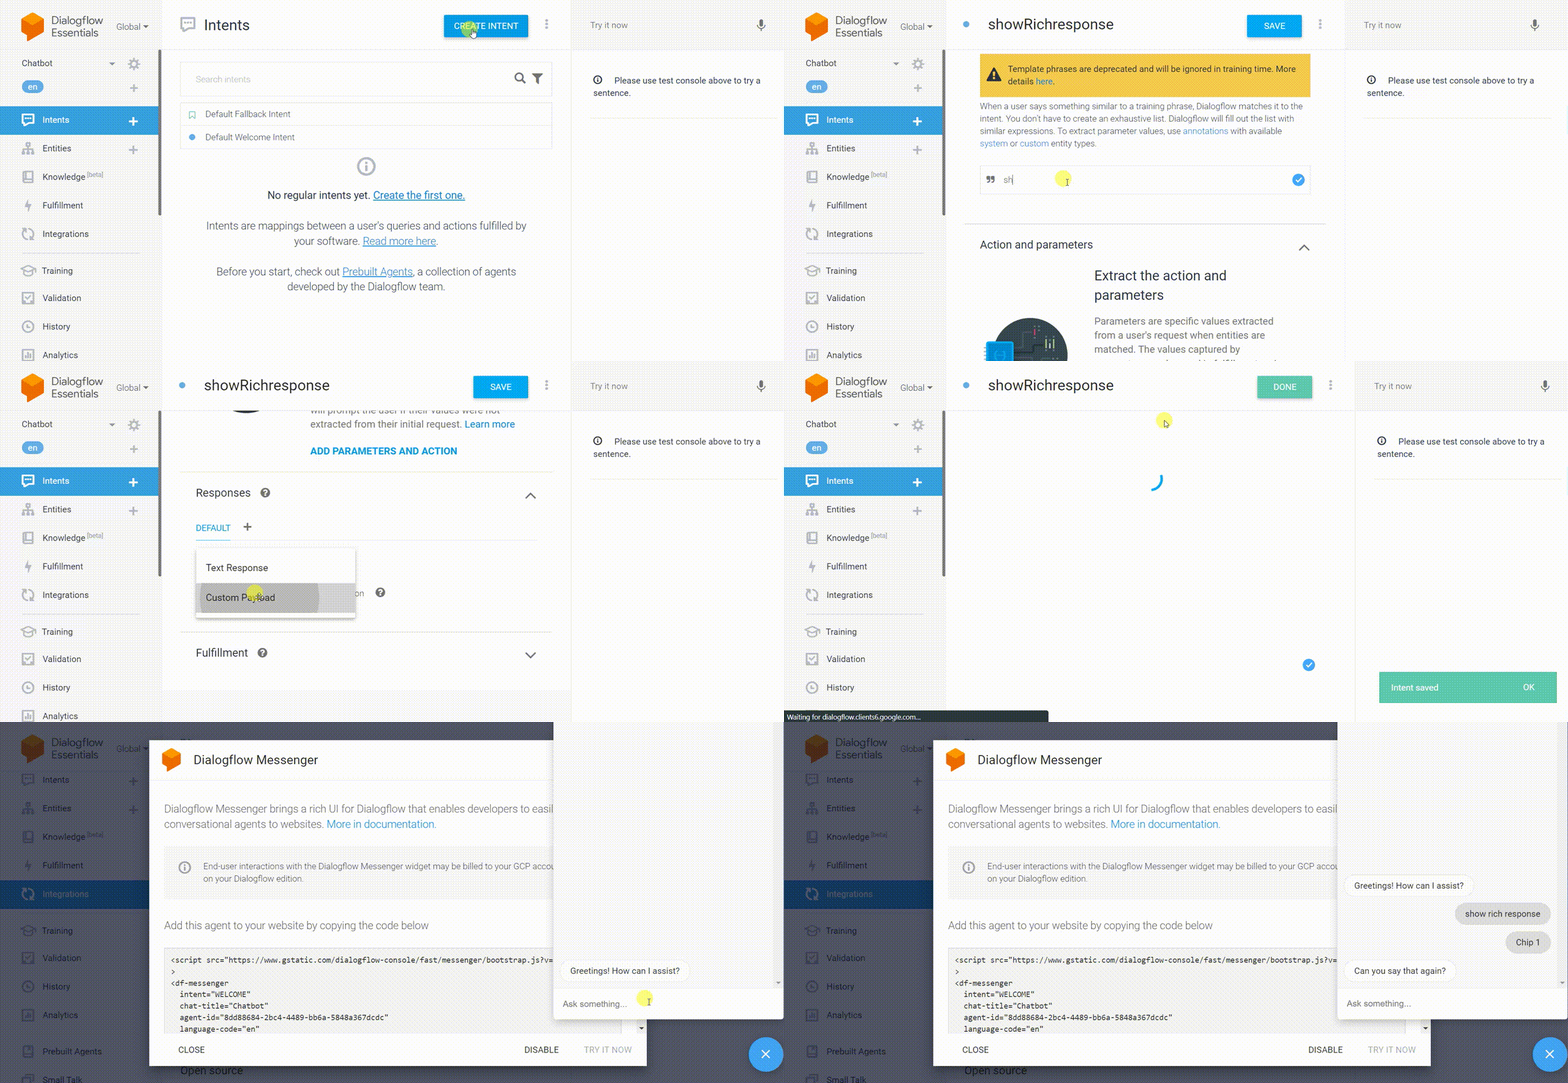
Instead of getting just the text response from the chatbot we can get rich responses like images, buttons, list response, suggestion chips, etc. For that, while creating the intent we have to choose ‘Custom Payload’ in the Add Response option. Here’s how we do it:
Adding follow-up intents:
In the ‘suggestion chip’ response above, note that when we click on the first chip, it acts as if we typed ‘Chip 1’ in the input request to the chatbot. Since there was no other intent defined with the training phrase ‘Chip 1’, the chatbot was unable to recognize the input and gave us the response from the Default Fallback Intent. Hence we will add the follow-up intent to our previous intent in order to get the desired response from the chatbot.
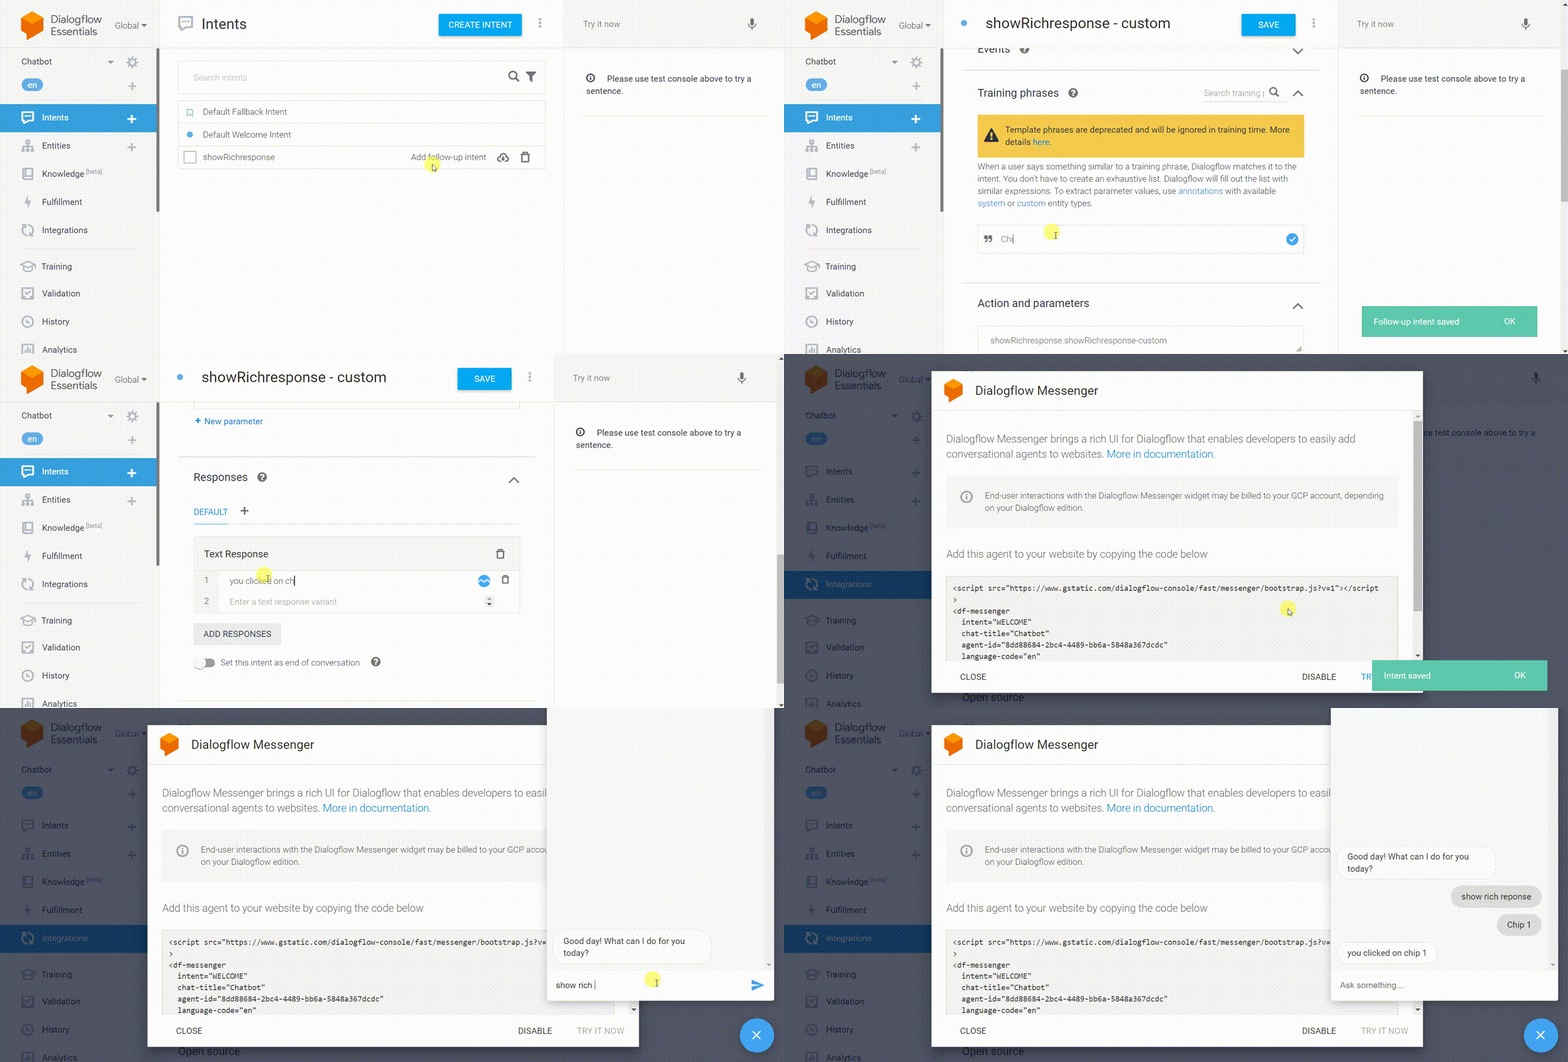
Setting up the Welcome Intent:
In order to make the chatbot start the conversation for the desired intent, we have to set that intent as the welcome intent. For that we will be adding the ‘Welcome’ event under the ‘Events’ section inside of our Intent. But before that, we have to remove the Welcome event from the Default Welcome Intent because there can be only one intent with Welcome event.
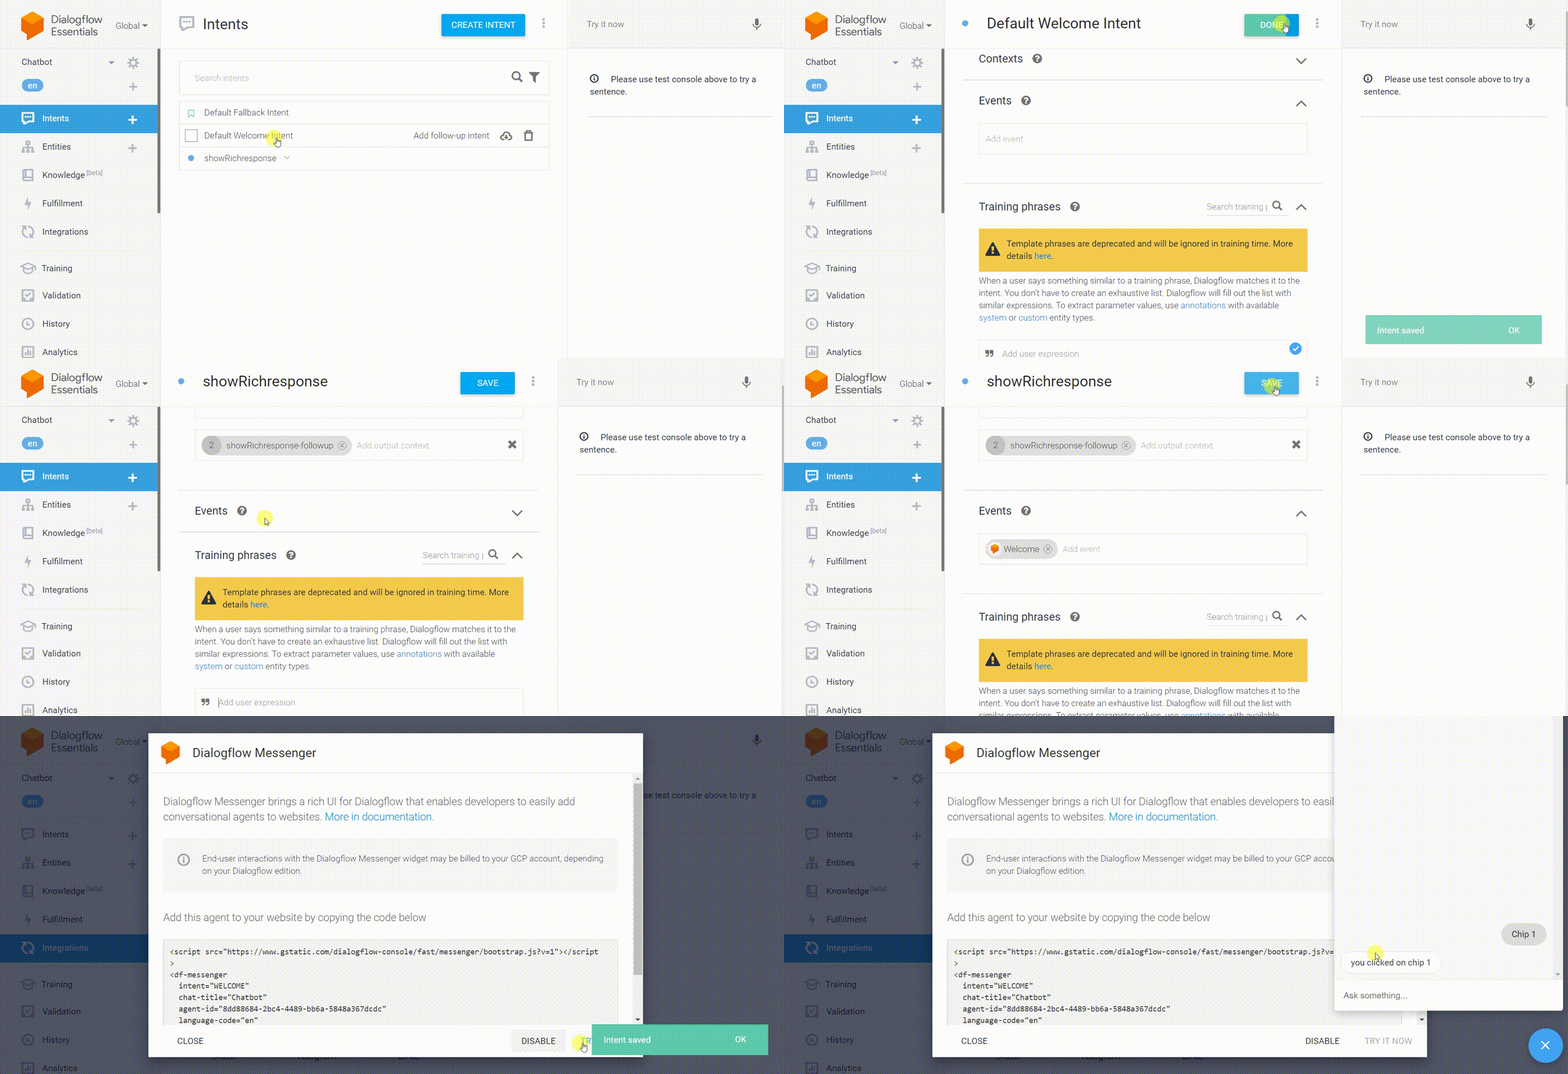
Note that we don’t have to type “show rich response” as we did earlier to get the chips as a response, that’s because we set the intent ‘showRichresponse’ as the welcome intent.
Setting up the parameters:
Parameters are like variables that we can set while adding the training phrases. Now depending on what user has entered in the training phrase, chatbot response would vary. We can refer to a parameter we defined in the training phrase by using $ symbol.
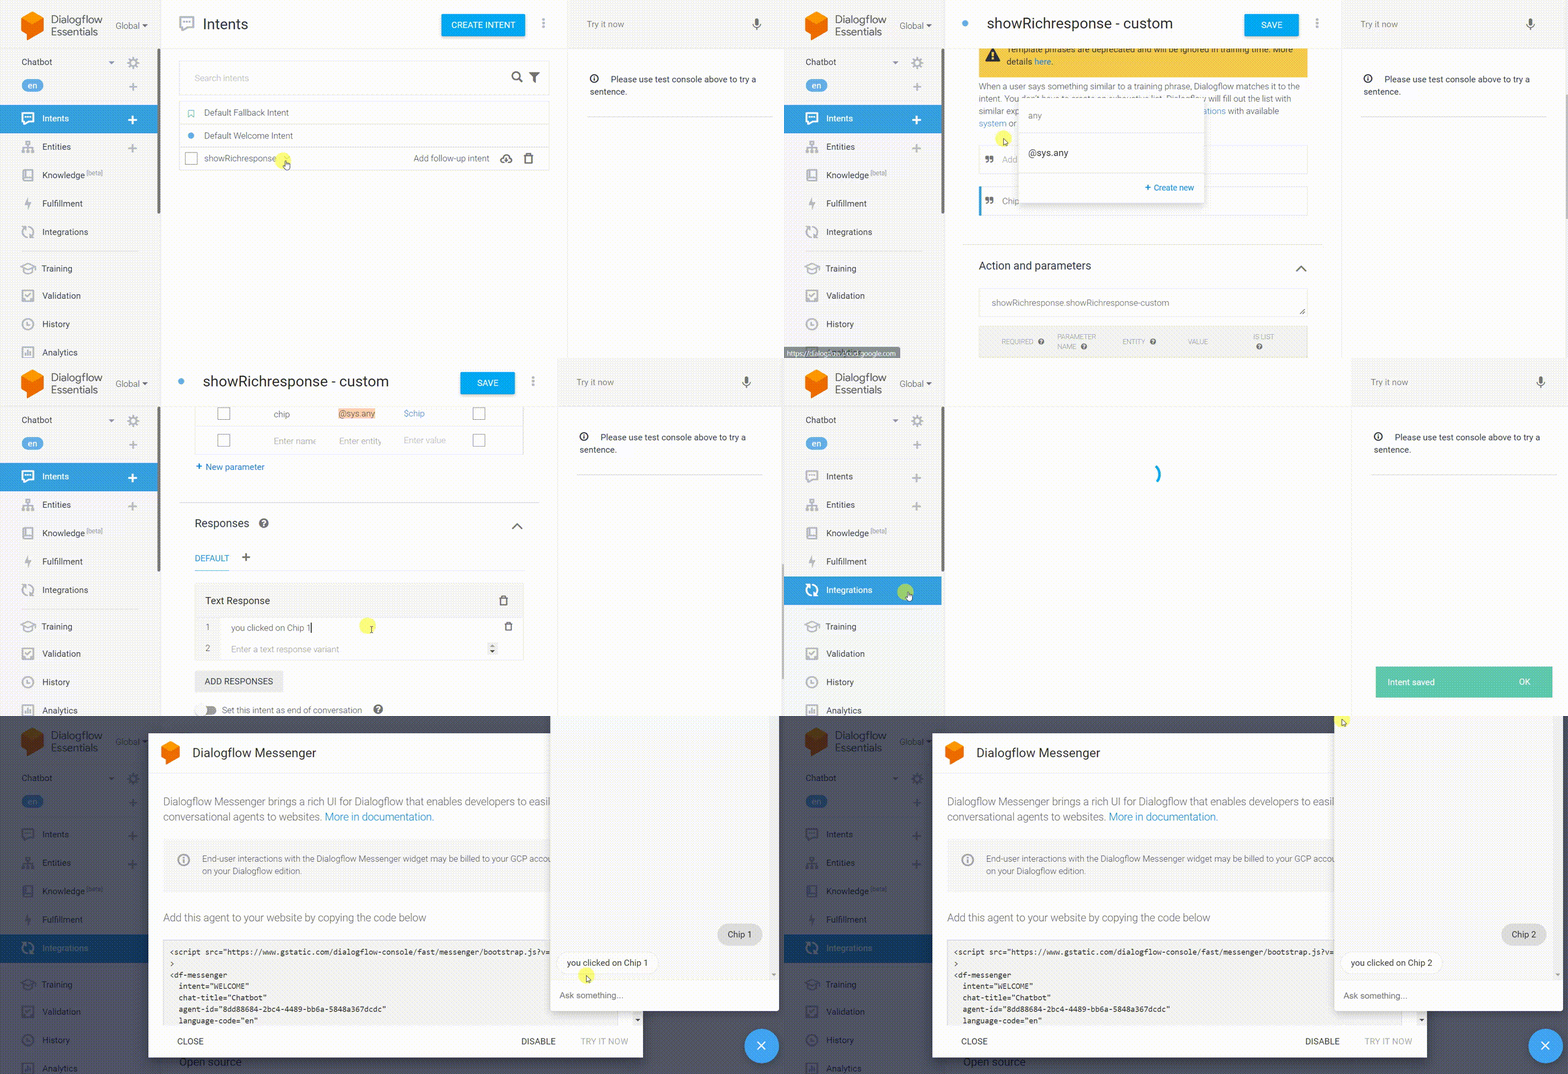
Back to the Node code:
Now we have all the pieces of the puzzle, the only thing left is to get the response from the api call at the backend and display it in the chatbot response.
We will be making that api call inside the function to which we are passing our agent as an argument (as discussed before). For making the api call we will be using the axios library.
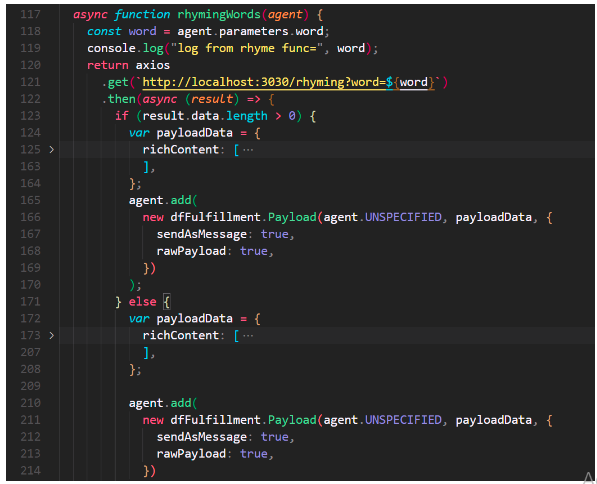
Referring to the chatbot we saw at the start, it is asking the user to rhyme or not, if the user clicks “Yes i want to rhyme” then it is asking for the word, we will set that word as a parameter.
Now in the code above, ‘ /rhyming’ is an API endpoint which gives back the rhyming words for the word given to it. First we will take the word from the chatbot input, then in the backend we access that word from the agent.parameters object and pass it as a query parameter to our api.
Once we get the response from the api call, we will send it as a custom payload (as discussed earlier) to the chatbot. Along with that, we will also send the custom payload for the suggestion chips asking the user whether they want to rhyme again.
Looping through the intents:
If the user clicks on “Yes i want to rhyme again” that means we have to loop back to the intent where we the user was replying “Yes i want to rhyme” for the first time. For that, we have to use the input and output Context.
Whenever we add a follow-up intent to some intent, it automatically adds some input and output contexts in both the intents.
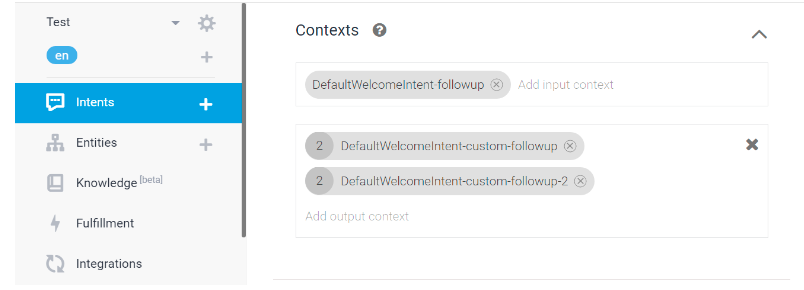
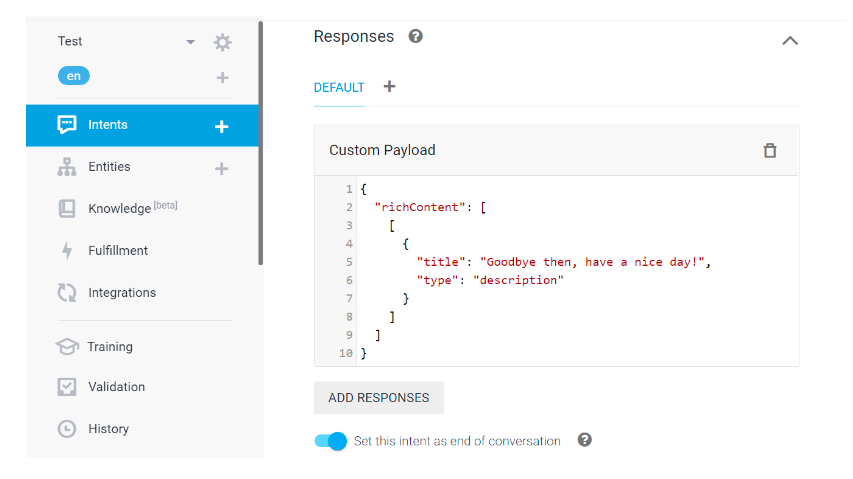
So, in order to loop through an intent, we have to set the output Context of child intent the same as the output Context of the parent intent. Otherwise if the user clicks on “No, i don’t want to rhyme again”, we will break the loop and turn ON the toggle “Set this intent as end of conversation” under the Responses.
Final touch-up:
In order to embed the chatbot agent we created to our own website, navigate to Integrations > Dialogflow Messenger, copy
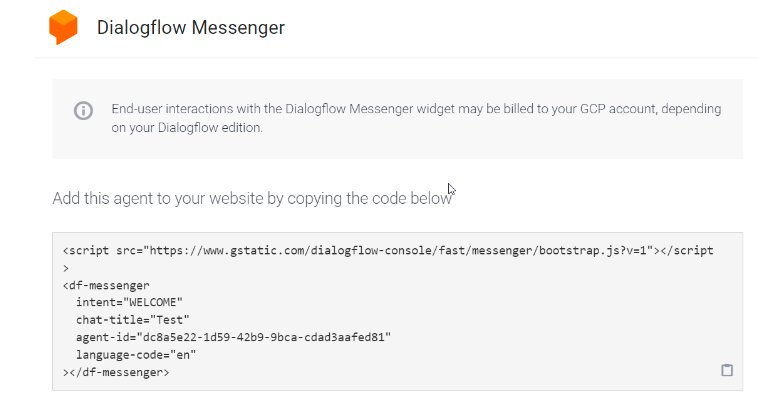
script and paste it to the index.html file of the website.
We can also do some CSS customizations in order to change the chat text color, background color and more.
Closure:
Phew! We finally integrated our chatbot agent with Node.js, and were able to display the API response to the user. With this integration we can call external APIs, make changes to the databases, and many other tasks that we cannot do with the dialogflow agent alone.
FAQs
Q: What are the essential components for building a chatbot with Node.js and Dialogflow? A: The core components are:
- A Node.js server using Express framework
- A Dialogflow agent with intents and entities
- The dialogflow-fulfillment library for Node.js
- An API to fetch data (optional)
- A webhook to connect Dialogflow to your Node.js server
Q: What is the role of Dialogflow in this setup? A: Dialogflow is responsible for understanding the user’s intent from their input and triggering the appropriate response. It can provide basic responses, but for more complex interactions, it sends requests to your Node.js server.
Q: Why use a Node.js server? A: A Node.js server allows you to handle complex logic, integrate with external APIs, process data, and provide more dynamic responses than Dialogflow alone can offer.
Q: How can I embed a Dialogflow chatbot into my website? A: You can integrate Dialogflow with your website using the following methods:
- Dialogflow Messenger: This provides a pre-built chat widget that can be easily embedded into your website.
- Custom UI: Build a custom chat interface using HTML, CSS, and JavaScript. Use the Dialogflow API to send and receive messages.
- Third-party chatbot platforms: Integrate Dialogflow with platforms like Kommunicate or Landbot to leverage their features and UI components.
Q: What are the benefits of using a custom UI for the chatbot? A: A custom UI offers greater flexibility in terms of design, branding, and user experience. You can tailor the chatbot’s appearance and behavior to match your website’s style.
Q: How can I handle user authentication and authorization in a chatbot integrated with a website? A: You can use session management techniques or integrate with authentication providers like OAuth to manage user identities within your chatbot.
Q: How do I handle errors in the API calls or webhook requests? A: Implement error handling mechanisms in your Node.js code. You can use try-catch blocks, promise rejection handling, or async/await error handling. Provide informative error messages to the user or log them for debugging.
Q: How can I improve the chatbot’s natural language understanding? A: Carefully define intents and entities in Dialogflow. Provide a rich set of training phrases to cover various user expressions. Consider using synonyms and alternative phrasings.
Q: What are some best practices for designing chatbot conversations? A: Keep the conversation focused and goal-oriented. Use clear and concise language. Provide options and suggestions to guide the user. Test the chatbot with different user scenarios.
Q: How can I deploy my chatbot to production? A: You can deploy your Node.js server to a cloud platform like Heroku, AWS, or Google Cloud. Ensure proper security measures and scalability.
Q: How do I handle multiple intents with similar training phrases? A: Use context to differentiate between intents. Context allows you to track the conversation flow and provide appropriate responses based on previous interactions.
Q: Can I use custom payloads for rich responses other than images and buttons? A: Yes, custom payloads can be used to send any structured data to the client. You can define your own payload format and handle it accordingly in your frontend.
Q: How do I handle fallback intents? A: Implement a fallback intent to handle cases where Dialogflow cannot match the user’s input to any defined intent. You can provide general assistance or guide the user to provide more information.
Q: What libraries or frameworks can I use for building the Node.js server? A: Express is a popular choice for building web applications and APIs. Other options include Koa, Hapi, and Fastify.
Q: How do I handle concurrent requests to the Node.js server? A: Node.js is inherently asynchronous, which helps handle concurrent requests efficiently. You can use libraries like async or bluebird for managing asynchronous operations.
Q: How do I secure the communication between Dialogflow and the Node.js server? A: Use HTTPS to encrypt data transmission. Consider using authentication and authorization mechanisms to protect your server from unauthorized access.


 +91-984-5825982 | +91-996-4689921
 sales@cumulations.com
 Send your requirement